
MAPLE LEAF STITCH CROCHET PATTERN: EASY TWO-COLOR TUTORIAL
The Maple Leaf Stitch is one of those crochet patterns that instantly makes you think of a steaming cup of tea, leaves crunching underfoot, and cozy evenings spent under a blanket on the couch.
It’s a textured, two-color stitch, perfect for those who love soft, natural textures and want to try something a little different. Ideal for blankets, scarves, or decorative cushions, it’s the perfect companion for your autumn projects.
This stitch is great for adventurous beginners — if you’re already confident with basic crochet stitches and want to challenge yourself with something a bit more elaborate, this is the one for you.
The secret lies in carefully following the stitch chart: it helps you spot exactly where to work the Puff Stitches that create the signature leaf shape. Keep reading to learn how to make it! 🍂

For the swatch shown in the photo, we used:
-
4 mm (US G6) crochet hook – adjust depending on your yarn and tension
-
Alpa Cotton yarn (51% alpaca – 49% Makò cotton) in Carmen (base) and Miguel (leaves)
Yarn Tips
Choosing the right yarn is essential.
A medium-weight yarn (like worsted or aran) is ideal because it provides warmth without feeling too heavy.
Pick autumn-inspired shades like burnt orange, deep red, or forest green to enhance the seasonal vibe.
For the best result, use a soft and airy yarn like our Alpa Cotton, a perfect blend of alpaca and cotton that gives just the right touch of warmth while keeping the fabric light.
Its undyed tones are great for contrast — we paired Carmen for the base and Miguel for the leaves.
How to Crochet the Maple Leaf Stitch
Techniques & Abbreviations
If you need a quick refresher on these stitches or want to start from scratch, check out all our video tutorials in the dedicated section on the Bettaknit website!
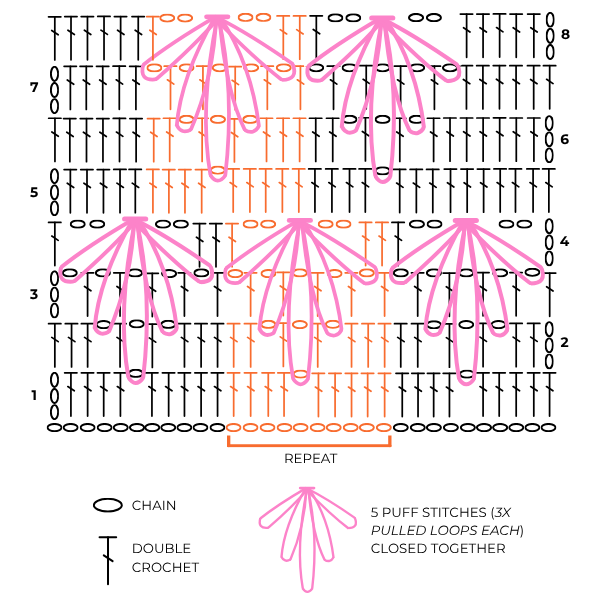
ch = chain
dc = double crochet
puff st = *yarn over, insert the hook in the indicated stitch, yarn over and pull up a loop, extending it slightly to the height of the current row*, repeat from * to * 2 more times, yarn over, pull through all loops on hook, ch. 1 to close.
5 puff sts closed together (leaf) = work 5 puff sts leaving loops on the hook, then yarn over and pull through all loops at once. The puff sts are worked as follows:
-
Into the 1st ch space of Row 3
-
Into the next ch space of Row 2
-
Into the next ch space of Row 1 (tip of the leaf)
-
Into the next ch space of Row 2
-
Into the next ch space of Row 3
Note: The puff stitches are made by inserting the hook into chain spaces from previous rows, at different heights. When working into lower rows, be sure to extend your loops upward to match the current row’s height — this ensures that the leaves lay flat and the tension stays even.
As you work, you’ll notice the leaf pattern develops upside down, meaning the tips of the leaves point downward.
Tutorial
With Color A, ch. a multiple of 10 + 1.
Row 1: Ch. 3 (counts as 1 dc), *4 dc, ch. 1, skip 1 ch., 5 dc*, repeat from * to * across.
Row 2: Ch. 3 (counts as 1 dc), *2 dc, (ch. 1, skip 1 dc) three times, 3 dc*, repeat from * to * across.
Row 3: Ch. 3 (counts as 1 dc), *ch. 1, skip 1 ch., 1 dc*, repeat from * to * across.
Row 4: Ch. 3 (counts as 1 dc), ch. 2, with Color B, work 5 puff sts closed together, with Color A ch. 2, 1 dc in the same space as the last puff st., *2 dc, ch. 2, with Color B work 5 puff sts closed together, with Color A ch. 2, 1 dc in the space of the last puff st.*, repeat from * to * across.
Row 5: Ch. 3 (counts as 1 dc), 5 dc, *4 dc, ch. 1, skip 1 ch., 5 dc*, repeat from * to * until 5 sts remain, 5 dc.
Row 6: Ch. 3 (counts as 1 dc), 5 dc, *2 dc, (ch. 1, skip 1 dc) three times, 3 dc*, repeat from * to * until 5 sts remain, 5 dc.
Row 7: Ch. 3 (counts as 1 dc), 5 dc, *ch. 1, skip 1 ch., 1 dc*, repeat from * to * until 5 sts remain, 5 dc.
Row 8: Ch. 3 (counts as 1 dc), 3 dc, *2 dc, ch. 2, with Color B work 5 puff sts closed together, with Color A ch. 2, 1 dc in the space of the last puff st.*, repeat from * to * until 6 sts remain, 6 dc.
Repeat Rows 1–8 to desired length.
Note: every time you complete a leaf, cut Color B leaving a tail of about 10 cm (4”), and weave in the ends later.
Diagram
Save this stitch to your Pinterest board!

Tips & creative ideas
-
Play with contrasts: try natural shades for the base and warmer tones for the leaves.
-
For a cleaner, more defined look, finish the border with one round of single crochet in the main color.
The Maple Leaf Stitch works beautifully for:
- Autumn blankets
- Cozy scarves and cowls
- Decorative sofa cushions
- Tote bags or pouches with leaf details
Whether you’re a curious beginner or an experienced crocheter, the Maple Leaf Stitch is an invitation to experiment, play with colors, and let nature inspire you.
It’s a stitch that captures autumn in every detail — soft, warm, and just a little bit magical.
Ready to give it a try? 🍂
As always, if you make it, tag us on Instagram @bettaknit and share your masterpiece with the community 💕
Grab your hook, pick your favorite Alpa Cotton colors, and watch the leaves come to life in your hands!
If you’re in full autumn mood, don’t miss our Acorn Stitch Crochet Tutorial!

